WiSP install update on Windows10 (64bit)

1. Make "wisp" folder such as C:/wisp, and
Connect correctly as "TNC --- PC (COM port)". tnc, fs3-1
2. Download "wisp3215.zip" into C:/wisp and extract them in C:/wisp.
http://dl.dropbox.com/s/cr4dgcuj82si6bn/wisp3215.zip
ftp://ftp.amsat.org/amsat/software/win32/wisp/
3. Move "bwcc.dll" into C:/Windows/System32 folder.
4. Delete "20107kep.txt".
5. Run "setup.exe" on Windows10.
6. (1) WiSP Directory : C:/wisp
(2) Check "I want to register".
(3) Input your Callsign.
(4) Input your Registration Number. (registration)
(5) Click "OK" button each the popup messages.
(6) It takes a while. Don't press "Cancel".
(7) Reboot gsc.exe
7. In the popup "WiSP Unregistered Copy", input again your
Registration Number and click "Register".
After the next run, it is not shown this message.
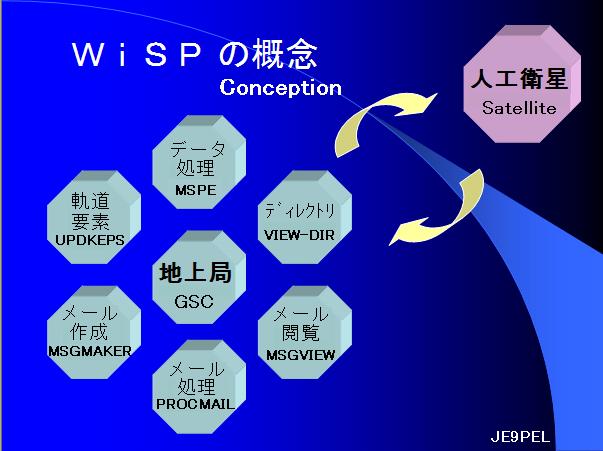
8. GSC - Setup - General Setup - WiSP Program Directory -
C:/wisp , and Display time in: Local
and GSC - Setup - Select Font
9. GSC - Setup - Station Setup - (ex) Latitude 35.4 N
Longitude 139.6 E
10. GSC - Setup - Edit MSPE equations
In the message [Not found C:/wisp/MSPE equations.TXT],
Click "Yes".
11. NOTEPAD, File - Open - Mspeeq~1.txt - Open - File -
Save attached new file name - MSPE Equations.TXT - Save
In the message [C:/wisp/MSPE Equations.TXT Overwrite?],
Click "Yes".
12. GSC - Setup - Edit View-Dir equations
In the message [Not found C:/wisp/View-Dir equations.TXT],
Click "Yes".
13. NOTEPAD, File - Open - View-d~1.txt - Open -
Remove [ZL2TPO] and add [your callsign]
Remove destination="ZL" and add destination="your callsign"
Save attached new file name - View-Dir Equations.TXT - Save
In the message [C:/wisp/View-Dir Equations.TXT Overwrite?],
Click "Yes".
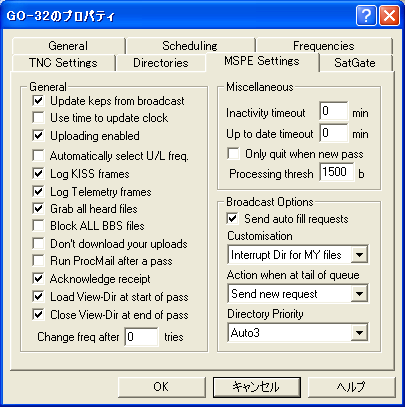
14. GSC - Setup - MSPE Setup - Sat Change - Automatic - OK
15. GSC - View-Dir Setup - Maximum messages to load - 900 - OK
16. GSC - MsgMaker Setup - Message expiry time - 2 - OK
17. GSC - ProcMail Setup - Automatic Keps file updating -
Check "Update with any keps file".
18. GSC - Database - Update Satellite Database - (ex)TLEM.TXT - OK
Then it show as [Not Updated].
But when the new keps, then it show as [Added ...].
When the orbital element is not recognized correctly,
try the following 20. 21.
19. GSC - Setup - Satellite Setup - Satellites
- New - General - Name GO-32
Satellite Type PacSat
Broadcast Callsign 4XTECH-11
BBS Callsign 4XTECH-12
Priority 1 (Order)
Frequencies (confirm)
TNC Settings (confirm)
Directries (confirm)
MSPE Settings (confirm)
In case of FalconSAT-3, input Broadcast Callsign = PFS3-11, and
BBS Callsign = PFS3-12.
Because the box of "Scheduling - Pragram" is the blanks when you chose
"Analogue" in "Satellite Type", you must add "C:/wisp/MSPE.EXE %S".
Input the priority of the satellite in "Scheduling Priority".
GSC - Setup - Satellite Setup - Satellites - Edit -
MSPE Settings, check below.
Update Keps from broadcast
Uploading enabled
Log KISS frames
Log Telemetry frames
Grab all heard files
Brock ALL BBS files
Acknowledge receipt
Load View-Dir at start of pass
Close View-Dir at end of pass etc.
And click "OK - Close", then GSC will schedule the satellite.
When the scheduling is not automatically displayed on GSC, try the following 21
after deletion "C:/wisp/WiSP Schedule.DAT" and "C:/wisp/WiSP.KEP"
20. Close GSC once last, and open again GSC so that WiSP.KEP and WiSP Schedule.DAT
becomes the update date. After doing so it, "GSC - Tracking - Redo Schedule".
21. How to reset WiSP.KEP:
(1) Delete "C:/wisp/WiSP Schedule.DAT" and "C:/wisp/WiSP.KEP"
(2) Run gsc.exe
(3) Then you will get an error message:
"GSC cannot find satellite ... in the keplerrian database"
OK each messages.
(4) GSC - Database - Update Satellite Database
and select the right TLE file.
(5) GSC - Setup - Satellite Setup - (satellite) - Edit - OK
Do it each satellites.
(6) GSC - Tracking - Redo Schedule
(7) When complete deletion and reinstall WiSP, see another article
because it is related to the registry -> UNinstall WiSP
22. GSC - Tracking - Track - Satellites - ADD
GSC - Tracking - Graphic Track - Tracking - Select Satellite
GSC - Setup - Select Map Font
23. See the following site about "WiSP registry Export/Import".
http://www.ne.jp/asahi/hamradio/je9pel/wispvist.htm
24. When the various WiSP settings are not saved on PC on Windows10,
I confirmed that it will be resolved if GSC is run as "administrator authority".
So, right-click the icon of gsc.exe that you use to run the program,
and then click "Run as administrator". -> Wisp & Settings
| (0) | (1) | (2) | (3) | (4) | (5) | (6) |
 |  |  |  |  |  | |
| (7) | (8) | (9) | (10) | (11) | (12) | (13) |
 |  |  |  |  |  |  |
| (14) | (15) | (16) | (17) | (18) | (19) | (20) |
 |  |  |  |  |  |  |
| (21) | (22) | (23) | (24) | (25) | (26) | (27) |
 |  |  |  |  |  |  |
[Supplement]
WiSP DDESat32, My_HP satpcdde.htm
WiSP FalconSAT-3, My_HP falcons3.htm
 Back to Top
 Back to Home Page
