 |
|
|---|---|
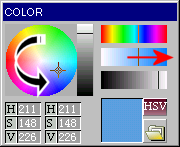 |
18.
Let's change the background color of this logo picture. If you cannot find a color you would like to use in the palette, you can create your favorite color with the Color Maker shown left. There are two ways of making a color. The color wheel and the brightness bar located in the left, and HSV channel bars located in the right. Use whichever you feel easier. If you use HSV bars, the middle bar is "Saturation". Sliding the pointer to right makes the color thicker, and to left makes the color thinner. The luminosity bar at the buttom changes the brightness. |
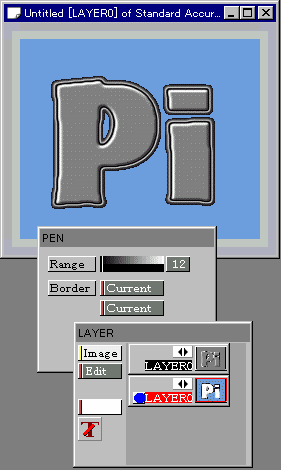 |
19.
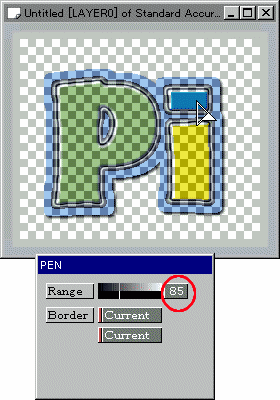
Click the "FillSeed"(ClosedArea)
icon in the tool bar, and, O-panel will change like the picture
left (the window with the title of "Pen".) Here you can set conditions of "Selection". FillSeed selects the color of the point you click in the image, and "Range" sets looseness of color detection. From zero to 255, the looseness becomes bigger. Here we set "12". If you set it to "0", for example, strictly the area of the clicked color is selected, so even the area of the extremely similar color will not be selected. This will result in leaving unwanted "gray" area around the logotype. Leave the "Border" settings to "Current" which means selection is only made based on the current layer information, and click the "black" background. Now the background is selected. Right-click there and choose "Fill" in the pop-up. Other black area such as the area in the hole inside the letter "P" should be processed the same. After filling all black area with the color, right-click again and choose "Deselect". Now the background color is changed. |
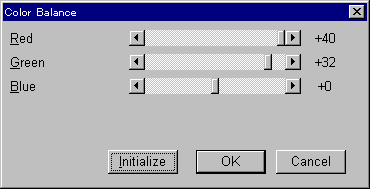 |
20.
Now we will go back to the original layer and change the color of the
logo itself. Click "Image" in the top menu, and choose "Color Balance". Sliding the pointer of each color channel toward the right makes the color stronger, and sliding the pointer toward left makes its complementary color stronger. If you are not familiar with the expression, "complementary colors", in other words, if you slide the pointer of each color channel to the left: Red becomes Cyan, Green becomes Magenta, Blue becomes Yellow. Since the base color of this logo is gray, if you want purer colors, you may want to change the base color brighter with "Brightness and Contrast" before applying the Color Balance. |
 |
If
the color becomes the one you wanted, click "OK". * Tip on change of color If you would like to completely change the "color", "Fill" fuction works better, while if you want the tone balance of the image, "Color Balance" is the better choice. |
 |
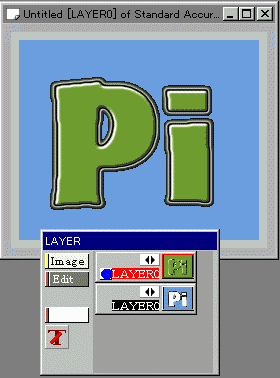
21.
Here is the result of the color change. Click "Edit" button in L-panel, and choose "Merge layers". Choose "Merge Visible" and click "OK". This will create a duplicate image with all layers merged. (The original image with layers remain.) |
 @ @ |
22.
Now we will work on the duplicate. If you need some tiny adjustments, click "Loope" (Magnifier) icon in the tool bar. Right-click on a color and the color is selected as the pen color. |
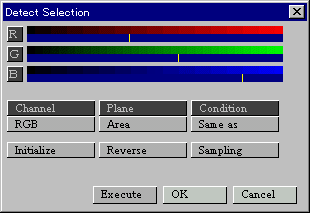 |
23.
We will edit selection now. From the top menu, click "Selection" - "Detect Selection", and you will get a dialog like the picture. Click "Sampling" button, make sure the pointer changes to "+", and drag the area of the background color. Right-click to finish sampling, and click "Execute" button. |
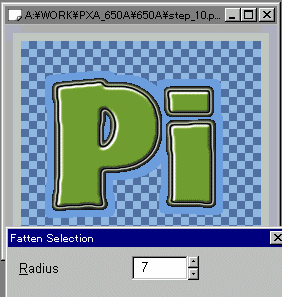 |
24.
Make sure the dragged area becomes "outside selection" (here
the area became "check"), and click "OK" button. 25. From the top menu, click "Selection" - "Fatten Selection". Input the number of pixels by which you would like to expand selected area in "Radius". Here I would like to expand the logo area by 7 pixels, so I input "7" in "Radius". |
 |
26.
Click "Selection" - "Invert Selection".
Set the background color of your webpage as the pen color, and "Fill"
the area. Right-click inside the canvas and choose "Deselect". Okay, this is the end of the basic part of logo making. The original image with layers had better be saved in PXA format. Save the new image that we have just worked on in BMP format, and decrease the number of colors using other softwares, and save it in PNG format. Next Advanced Section. |
 |
Practice
A Click "Selection" - "Detect Selection",
and select the logo area as in 23 and 24 above. Click "Selection" - "Convert to Layer" and the logo part will be on a new layer. Make the new layer "current", click "Edit" button in L-panel, and choose "Drop Shadow". Setting of Drop Shadow: The black shadow in the picture: Color/Black, Offset/Horizontal&Vertical "2", Blur/"2". The white shadow in the picture: Color/White, Offset/Horizontal&Vertical "-2", Blur/"0". |
 |
Practice
B Reverse the setting of Drop Shadow at Practice A and you will
get the result like the picture. The surrounding color of the logo is the same as the background color in this picture. |
 |
Practice C Now "Negative" is applied to Practice B picture. |
 |
If
you would like to change colors of each letter like the
one in the top page, click "FillSeed"
icon in the tool bar, make the figure of the "Range"bigger in
O-panel, and click the area you want to change
the color of. And adjust it with "Color Balance" function. After changing the color, right-click and choose "Deselect". Repeat this process till you change the colors of all the areas you want, and make small amendment, if necessary, with "Loope" function. |