

La Fonera+にDD-WRTをインストールする
La Fonera+ (FON2201E) にDD-WRTをインストールします。
インストールに使うLinuxマシンの準備
インストールに使用するLinuxマシンUbuntu 9.04を準備します。
TFTPサーバ Advanced TFTP (atftpd)をインストールします。
$ sudo aptitude install atftpd
openbsd-inetdサービスを起動(再起動)し、インストールしたatftpdの設定を読み込ませます。
$ sudo /etc/init.d/openbsd-inetd start
UDP 69番ボートが開いていることを確認します。
$ netstat -lnu | grep :69
atftpdがファイルを公開するディレクトリは /var/lib/tftpboot に用意されます。
$ sudo /etc/init.d/openbsd-inetd start
 * Starting internet superserver inetd                                             [ OK ]
$ netstat -lnu | grep :69
udp        0      0 0.0.0.0:69              0.0.0.0:*
$
TelnetクライアントからのLa Fonera+へのアクセス
TelnetクライアントからLa Fonera+のブートローダRedBootにアクセスできるようにします。
 La Fonera+にTelnetクライアントからアクセスする
DD-WRTファームウェアのダウンロード
DD-WRTのファームウェアをダウンロードします。
ダウンロードサイト
http://www.dd-wrt.com/site/support/router-database
FON LaFonera+ 2201用のv24 preSP2 (Build14896)をダウンロードします。
ダウンロード内容
fonera_flashing.txt |
FONへのDD-WRTインストール手順書
|
|---|---|
linux.bin |
DD-WRTファームウェアイメージ
|
fonera-firmware.bin |
DD-WRTインストール済みFONの更新要イメージ
今回は使用しません
|
ダウンロードした linux.bin を /var/lib/tftpboot にコピーします。
$ sudo cp linux.bin /var/lib/tftpboot
コピーしたファイルのパーミッション設定を変更します。
$ sudo chmod o+r /var/lib/tftpboot/linux.bin
DD-WRTのインストール
RedBootブートローダとTFTPサーバのIPアドレス設定
RedBootブートローダとTFTPサーバのIPアドレスを設定します。
RedBoot> ip_address -l 192.168.1.1 -h 192.168.1.2
RedBoot> ip_address -l 192.168.1.1 -h 192.168.1.2
IP: 192.168.1.1/255.255.255.0, Gateway: 0.0.0.0
Default server: 192.168.1.2
RedBoot>
DD-WRTファームウェア保存領域の確保
オリジナルのファームウェアを削除し、DD-WRTファームウェアの保存領域を確保します。
RedBoot> fis init
... - continue (y/n)? y
RedBoot> fis init
About to initialize [format] FLASH image system - continue (y/n)? y
*** Initialize FLASH Image System
... Erase from 0xa87e0000-0xa87f0000: .
... Program from 0x80ff0000-0x81000000 at 0xa87e0000: .
RedBoot>
Llinux.binの転送とフラッシュメモリへの書き込み
linux.bin をTFTPサーバから転送し、フラッシュメモリへ書き込みます。
RedBoot> load -r -v -b 0x80041000 linux.bin
RedBoot> load -r -v -b 0x80041000 linux.bin
Using default protocol (TFTP)
|
Raw file loaded 0x80041000-0x8066efff, assumed entry at 0x80041000
RedBoot>
RedBoot> fis create linux
メッセージが表示されるまで45分ほどかかります。
RedBoot> fis create linux
... Erase from 0xa8030000-0xa865e000: ...................................................................................................
... Program from 0x80041000-0x8066f000 at 0xa8030000: ...................................................................................................
... Erase from 0xa87e0000-0xa87f0000: .
... Program from 0x80ff0000-0x81000000 at 0xa87e0000: .
RedBoot>
RedBoot> fconfig
RedBoot> fconfig
Run script at boot: true
Boot script:
.. fis load -b 0x80100000 loader
..  go 0x80100000
Enter script, terminate with empty line
> fis load -l linux
> exec
>
Boot script timeout (1000ms resolution): 10
Use BOOTP for network configuration: false
Gateway IP address: 192.168.1.1
Local IP address: 192.168.1.1
Local IP address mask: 255.255.255.0
Default server IP address: 192.168.1.254
Console baud rate: 9600
GDB connection port: 9000
Force console for special debug messages: false
Network debug at boot time: false
Update RedBoot non-volatile configuration - continue (y/n)? y
... Erase from 0xa87e0000-0xa87f0000: .
... Program from 0x80ff0000-0x81000000 at 0xa87e0000: .
RedBoot>
再起動
La Fonera+を再起動します。
RedBoot> reset
DD-WRTの基本設定
Webブラウザで http://192.168.1.1/ にアクセスします。
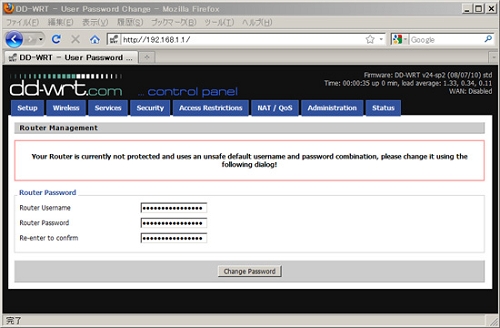
パスワードの変更
パスワードを変更します。
・Router Username に root を入力します。
・Router Password と Re-enter to Confirm にパスワードを入力します。
・Change Password ボタンをクリックします。
メニューの日本語化
・Administrationタブを選択します。
・Language SelectionでJapaneseを選択します。
・Apply Settingボタンをクリックします。
control panelの表示が日本語になります。
送信出力の設定
・無線LAN → 基本 を選択します。
・詳細設定 にチェックを入れます。
・送信出力 で10mW (10dBm)に設定します。
・設定 ボタンをクリックします。
時刻管理の設定
・基本 → 基本 を選択します。
・NTPクライアント を 有効 にします。
・タイムゾーンの UTC を UTC+09:00 に変更します。
・サマータイム設定 は なし にします。
・サーバIP にNTPサーバ ( ntp.jst.mfeed.ad.jp ) を設定します。
・設定 ボタンをクリックします。
参考サイト
RedBoot User's Guide
http://www.ecoscentric.com/ecospro/doc.cgi/html/redboot-guide/redboot-guide.html
変更 2010.10.29
2010.10.20