A New Development in HADES-SA SSDV Image Decoding

#1, #2, #3, Flow
(Part #1)
HADESx Generic Decoder
[HADESx Generic Decoder @N6RFM]
Official GitHub page: https://github.com/N6RFM/HADESx-Decoder/
Release history: https://github.com/N6RFM/HADESx-Decoder/releases
- Supports not only UNNE-1B, but also HADES-SA and HADES-L.
- Can process supported SDR I/Q recordings and audio WAV files directly.
- Supports CODEC2 voice recovery.
- Improves bit-timing errors that can be problematic with conventional GNU Radio-based approaches.
Problems with Conventional Bit-Timing Recovery and Improvements
The conventional bit-timing recovery process could encounter the following problems:
With unscrambled data, the symbol clock could drift by as much as 3%. This could cause
a shift of several bits immediately after the sync word, preventing frames from being
correctly extracted. This issue was improved by resetting the clock at the beginning
of each burst and learning the timing from the training pattern.
Main Changes in Decoder v1.7.2
- Recording the reception time of each frame:
UTC reception timestamps have been added to the console output and ".tlm" files.
- Satellite clock cross-checking:
The elapsed time since UNNE-1B startup is compared with the recording timestamp,
with warnings issued for possible time-setting errors and related issues.
- Raw frame data display:
For UNNE-1B telemetry, which does not yet have a field-specific decoder,
the complete frame is now displayed in HEX format, similar to SoundModem, Direwolf.
(Part #2)
HADESx Generic Decoder: Installation and Operational Verification
1. Installing HADESx Generic Decoder
This time, I installed HADESx Generic Decoder v1.7.2 on Windows 11 and verified
its operation. This decoder supports HADES-SA, HADES-L, and other related satellites.
Installation Environment
Item Details
----------------------------------
OS Windows 11
Python 3.14.3
HADESx v1.7.2
Installation Directory C:\Program Files\hadesx\HADESx-Decoder-1.7.2
--------------------------------------------------------------------
* Before installation, I configured the access permissions for the
C:\Program Files\hadesx folder.
[Steps to Configure Access Permissions]
(1) Right-click the hadesx folder and select "Properties".
(2) Select the "Security" tab.
(3) Under "Group or user names", select "User".
(4) In the permissions section below, check the boxes for Read and Write permissions.
(5) Click "Apply", followed by "OK", to save the settings.
After configuring these permissions, HADESx installation command completed successfully.
2. Decoding Test Using the Official Sample
After installation, I used an official sample included with HADESx to verify that
decoding could be performed successfully. The sample file contains a stereo I/Q WAV
recording of HADES-SA reception data.
File Used: "examples\iq\hades_sa_ssdv_pass.wav"
3. Commands Executed in CMD
The following commands were executed, starting with Python environment checks and
ending with the decoding of the sample WAV file.
(1) Check the Python version
py --version
(2) Check the Python executable path
py -c "import sys; print(sys.executable)"
(3) Change to the HADESx directory
cd /d "C:\Program Files\hadesx\HADESx-Decoder-1.7.2"
(4) Install HADESx
py -m pip install -e .
(5) Display HADESx help
py -m hadesx --help
(6) Check the sample directory
dir examples
(7) Check the sample IQ directory
dir examples\iq
(8) Display the sample README
type examples\iq\README.md
(9) Decode the HADES-SA sample WAV file
py -m hadesx examples\iq\hades_sa_ssdv_pass.wav
By executing these commands, I confirmed that HADESx started correctly and successfully
loaded and decoded the sample data.
4. Decoding Results from the Official HADES-SA Sample
A total of five SSDV packets were successfully decoded from the official sample WAV file.
Item Result
--------------------------------------------
Satellite SpinnyONE HADES-SA
Modulation / Baud Rate FSK / 800 baud
Reception Format Stereo I/Q WAV
Sample Rate 50,000 samples/s
Packet Type Type 10 (SSDV image)
CRC All 5 packets OK
Valid Frames 5 frames
--------------------------------------------
This test confirmed that "HADESx Generic Decoder v1.7.2" operates successfully in Windows 11
Python 3.14.3 environment and can decode "HADES-SA SSDV" packets. At this stage, only packet
decoding has been verified. Reconstruction of the JPEG image file still needs to be tested
separately using "hadesx-ssdv" and "ssdv". In the next part, I will attempt to reconstruct
a JPEG image from the five decoded SSDV packets.
(Part #3)
Reconstructing JPEG Images from SSDV Packets Using HADESx
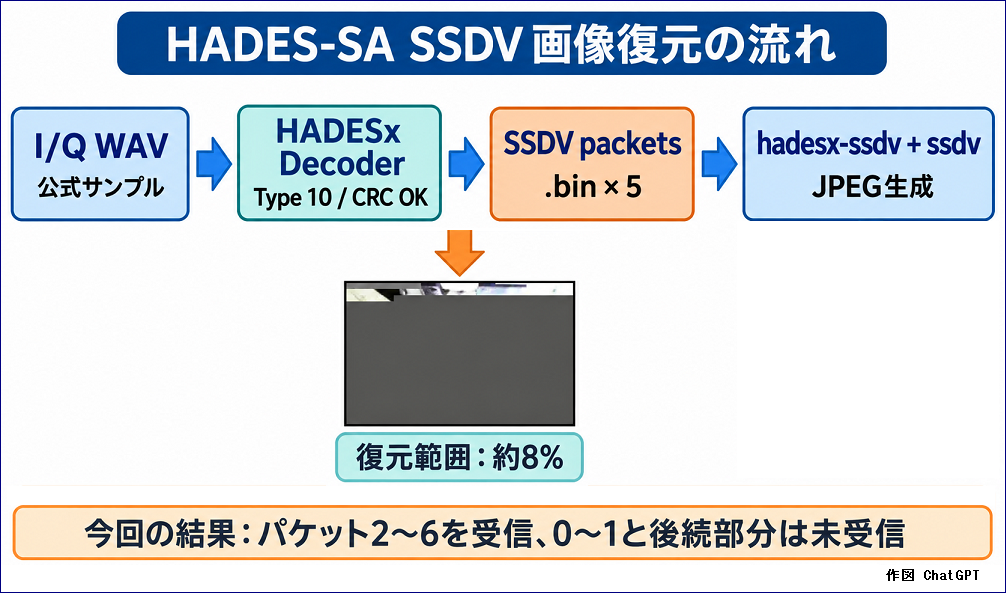 In the previous article, I installed "HADESx Generic Decoder v1.7.2" on Windows 11 and
confirmed that five HADES-SA SSDV packets could be successfully decoded from the official
WAV sample.In this article, I carried out an experiment to combine those five SSDV packets
and generate a JPEG image file.
1. [Decoding SSDV Packets with HADESx Decoder]
The file used was the official WAV sample included with HADESx.
"C:\Program Files\hadesx\HADESx-Decoder-1.7.2\examples\iq\hades_sa_ssdv_pass.wav"
Launch CMD and move to the HADESx installation folder.
cd /d "C:\Program Files\hadesx\HADESx-Decoder-1.7.2"
Decode the official sample.
py -m hadesx examples\iq\hades_sa_ssdv_pass.wav
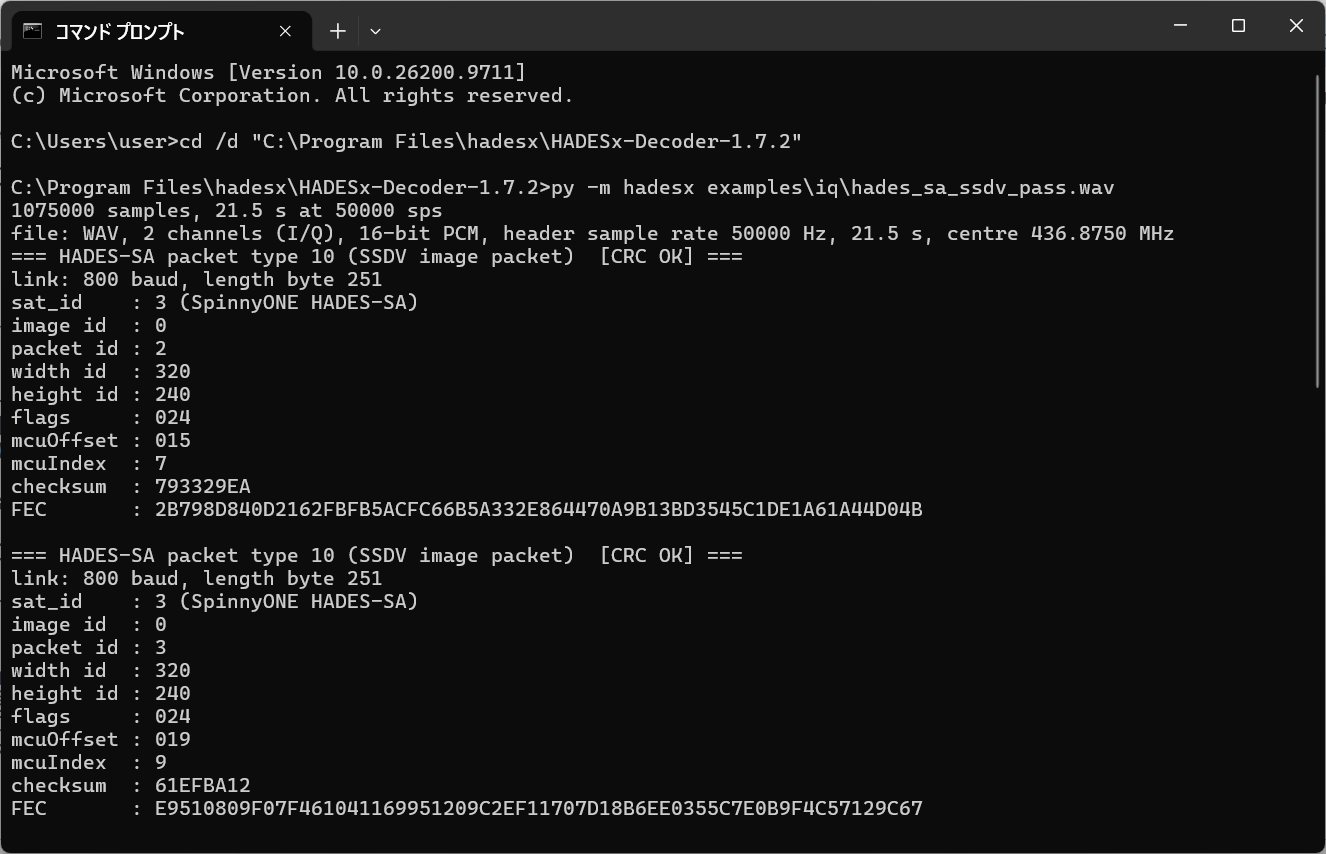 Execution results:
- Satellite: SpinnyONE HADES-SA
- Modulation: FSK 800 baud
- Packet type: Type 10 (SSDV image packet)
- Image ID: 0
- Image size: 320 x 240
- Received packets: 2, 3, 4, 5, 6
- CRC: All five packets OK
- 5 valid frame(s)
2. [Saving SSDV Packets to Files]
Next, I specified an output folder and ran the decoder again to save the decoded packets to files.
py -m hadesx examples\iq\hades_sa_ssdv_pass.wav --outdir ssdv_result
This time, the five SSDV packets were saved as individual BIN files.
Example filenames: Each file is 256 bytes.
sat_03_type_10_ssdv_img_000_packet_0002.bin
sat_03_type_10_ssdv_img_000_packet_0003.bin
sat_03_type_10_ssdv_img_000_packet_0004.bin
sat_03_type_10_ssdv_img_000_packet_0005.bin
sat_03_type_10_ssdv_img_000_packet_0006.bin
Check the contents of the output folder.
dir ssdv_result
3. [Checking hadesx-ssdv.exe]
HADESx includes "hadesx-ssdv.exe", a utility for combining the decoded SSDV packets
and converting them into a JPEG image. Next, check the location of the executable.
dir "C:\Users\user\AppData\Local\Programs\Python\Python314\Scripts\hadesx-ssdv*"
The following file was found.
"C:\Users\user\AppData\Local\Programs\Python\Python314\Scripts\hadesx-ssdv.exe"
Display the help information for "hadesx-ssdv.exe".
"C:\Users\user\AppData\Local\Programs\Python\Python314\Scripts\hadesx-ssdv.exe" --help
The hadesx-ssdv.exe program takes the HADESx Decoder output folder as an input, combines
SSDV packets by image ID, and automatically generates SSDV files and JPEG image files in
the specified output folder.
4. [Combining SSDV Packets and Generating a JPEG Image]
For image reconstruction, I used "hadesx-ssdv.exe", which is newly provided with HADESx.
This program internally uses "ssdv.exe", which I had previously used for HADES-SA.
The other three files are not actually used, but I copied all four of the following
files to the HADESx installation folder just in case.
run_ssdv.bat
ssdv.exe
ssdv-x86.exe
ssdv-merge-windows-x86.exe
Source locations:
"C:\Program Files\hadesa\SSDV-minimodem\SSDVs\ssdv.exe"
"C:\Program Files\hadesa\AMSAT-EA_HADES-SA_SpinnyONE_SSDV_utilities\run_ssdv.bat"
"C:\Program Files\hadesa\AMSAT-EA_HADES-SA_SpinnyONE_SSDV_utilities\ssdv-x86.exe"
"C:\Program Files\hadesa\AMSAT-EA_HADES-SA_SpinnyONE_SSDV_utilities\ssdv-merge-windows-x86.exe"
Generate a JPEG image by specifying image ID "0".
"C:\Users\user\AppData\Local\Programs\Python\Python314\Scripts\hadesx-ssdv.exe" ssdv_result --image 0 --ssdv "C:\Program Files\hadesx\HADESx-Decoder-1.7.2\ssdv.exe"
Execution results:
image 0: 5 packet(s), highest number 6, 2 missing -> ssdv_result\hades_sa_image_000.ssdv
packets: ..#####?
missing: 0-1
packet 0-1: about 0 % to 2 % down the picture (rows 0-6 of 240)
after packet 6: not received (the end of the image has not arrived): from about 8 % down, rows 20-240 of 240
picture: ssdv_result\hades_sa_image_000.jpg
5. [Checking the Generated JPEG Image File]
dir ssdv_result\*.jpg
Execution results:
2026/11/10 14:35 2,831 hades_sa_image_000.jpg
1 File(s) 2,831 bytes
Generated file:
C:\Program Files\hadesx\HADESx-Decoder-1.7.2\ssdv_result\hades_sa_image_000.jpg
When I opened the generated JPEG image, a portion of the picture appeared at the top,
while the area below it remained unreconstructed. The image size was 320 x 240 pixels.
Five packets, numbered 2 through 6, had been received; packets 0 and 1, as well as packet
7 onward, had not been received. As a result, only about 8% of the entire image was displayed.
Although the complete image could not be reconstructed, I was able to successfully generate
an actual JPEG image file from the SSDV packets.
6. [Comparison with Previous Image Reconstruction Methods]
In previous articles No.1182 and No.1183, I extracted SSDV packets from SoundModem or
SatNOGS CSV data and reconstructed the images. The HADESx method used in this experiment
decodes SSDV packets directly from an I/Q WAV file and proceeds through to image reconstruction.
Item No.1182 / No.1183 This time: No.1203
----------------------------------------------------------------------
Input data SDR reception / SatNOGS CSV I/Q WAV
Packet extraction SoundModem / CSV analysis tool HADESx v1.7.2
Packet storage Individual .bin files Individual .bin files
Packet combining Sequential concatenation, etc. hadesx-ssdv.exe
JPEG conversion ssdv.exe ssdv.exe
----------------------------------------------------------------------
No.1182, No.1183, No.1203
In No.1183, individual .bin files were extracted from a SatNOGS CSV file using a dedicated
tool and then combined with the following commands.
cat *.bin > combined.bin
ssdv -d combined.bin output.jpg
In this experiment, HADESx handles packet extraction, while "hadesx-ssdv.exe" handles
packet combining and image reconstruction.
"C:\Users\user\AppData\Local\Programs\Python\Python314\Scripts\hadesx-ssdv.exe"
7. [Results of This Experiment]
This experiment confirmed that the following sequence of operations works successfully
in the Windows 11 / Python 3.14.3 / HADESx Generic Decoder v1.7.2 environment.
(1) Decode HADES-SA SSDV packets from an I/Q WAV file
(2) Save five packets with valid CRCs as ".bin" files
(3) Combine the packets using "hadesx-ssdv.exe"
(4) Generate a JPEG image file using "ssdv.exe" internally
(5) Open and display the generated JPEG image
With the official sample used in this experiment, only five packets were received,
so reconstruction was limited to approximately 8% of the entire image. Nevertheless,
successfully completing the entire process of converting SSDV data from an I/Q WAV
file into a JPEG image using HADESx was a significant achievement. In the future,
I hope to collect more SSDV packets from actual satellite reception data and attempt
to reconstruct the complete image.
 Right: Ishigaki Island, Okinawa Prefecture, where I currently live.
Photographed on May 6, 2020, during the COVID-19 pandemic.
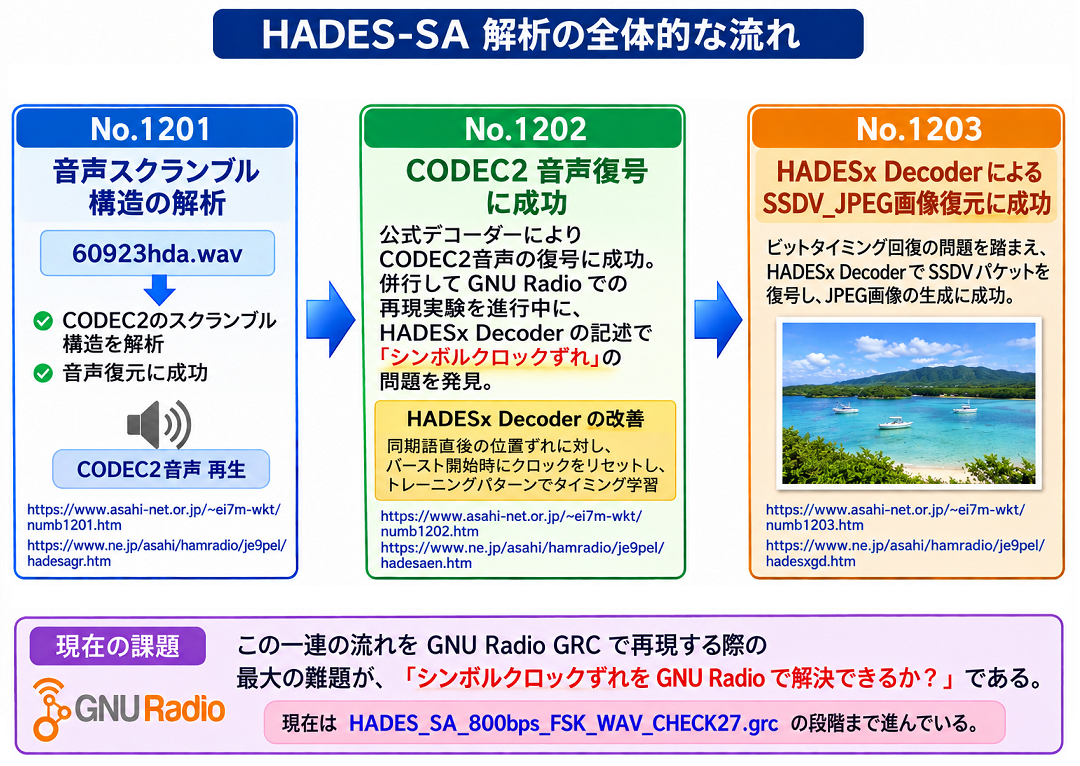
[No.1201: Analysis of the Audio Scrambling Structure]
The analysis of the "HADES-SA CODEC2 audio scrambling structure" in "60923hda.wav" was successful,
and CODEC2 audio restoration was completed using the method described on the official website.
https://www.asahi-net.or.jp/~ei7m-wkt/numb1201.htm
https://www.ne.jp/asahi/hamradio/je9pel/hadesagr.htm
[No.1202: Successful CODEC2 Audio Decoding]
The audio decoding experiment using the official HADES-SA CODEC2 decoder was successful.
During the parallel experiment to reproduce this process using "GNU Radio GRC", I noticed
the following problems described in the "HADESx Decoder" documentation.
> Problems with Conventional Bit Timing Recovery and Improvements
> (HADESx Decoder Preface)
>
> Conventional bit timing recovery processing could sometimes cause the following problems.
> With unscrambled data, the symbol clock could deviate by up to 3%. Immediately after
> the sync word, the bit position could shift by several bits, making it impossible to extract
> frames correctly. To address this problem, an improved method was introduced. The clock
> is reset at the beginning of each burst, and timing is learned from the training pattern.
https://www.asahi-net.or.jp/~ei7m-wkt/numb1202.htm
https://www.ne.jp/asahi/hamradio/je9pel/hadesaen.htm
[No.1203: Successful SSDV JPEG Image Reconstruction Using HADESx Decoder]
In light of the conventional bit timing recovery problems, I shifted my focus to the
"HADESx Decoder" and successfully generated an SSDV JPEG image using this decoder.
https://www.asahi-net.or.jp/~ei7m-wkt/numb1203.htm
https://www.ne.jp/asahi/hamradio/je9pel/hadesxgd.htm
The sequence "No.1201 → No.1202 → No.1203" represents the overall progress of this work so far.
The major challenge encountered in the current experiment to reproduce these processes using
"GNU Radio GRC" is whether the symbol clock offset can be corrected within GNU Radio GRC.
The experiment has now reached the stage of "HADES_SA_800bps_FSK_WAV_CHECK27.grc".
 Back to Top
 Back to Home Page