私は中高年である。仮想化のことなど、まったくわからない(下層に陥る下層化なら進行中である)。 さて、わけもわからず新しい流れに飛び込んでみた結果である。
どこかの宣伝文句に、Vagrant と Virtual Box の違いを説明できますか、 とあった気がする。
Vagrant 自体には仮想化の機能はない。仮想化するのは Virtual Box で、 その Virtual Box の仮想化の手続きを簡素化するのが Vagrant だという説明を聞いたことがある。
まあ、Vagrant を起動させようと思ってやってみたことを説明する。
私の実物の機械には Windows 10 が搭載されている。これに、仮想の Linux 、ここでは Ubuntu を載せようとする。 そのためには、Vagrant という、仮想機械を構築するためのソフトウェアを使うのが便利だ。
Vagrantfile というのがデフォルトの名前である。私が試したのは、ある方が作成したイメージをインストールする Vagrantfile で、一般には出回っていないものである。 以下、このイメージは C:\vagrant\private フォルダ配下にインストールしたものとする。
C:Vagrant\private> vagrant up
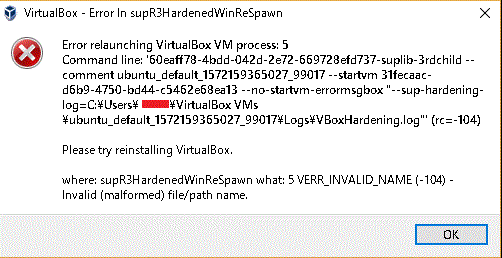
次の通り、別画面にエラーが出て、異常終了した。
情報はいくつかある。
Error Relaunching で Google 検索すると、いくつか見つかる。 ちなみに、検索語句で補完されるのは、 error relaunching virtualbox vm process 5 である。
参考まで、起動したコマンドプロンプトの画面のエラー前後は次の通り。
  config.vm.synced_folder '/host/path', '/guest/path', SharedFoldersEnableSymlinksCreate: false
==> default: Clearing any previously set network interfaces...
==> default: Preparing network interfaces based on configuration...
    default: Adapter 1: nat
==> default: Forwarding ports...
    default: 8080 (guest) => 8080 (host) (adapter 1)
    default: 3000 (guest) => 3000 (host) (adapter 1)
    default: 8000 (guest) => 8000 (host) (adapter 1)
    default: 22 (guest) => 2222 (host) (adapter 1)
==> default: Running 'pre-boot' VM customizations...
==> default: Booting VM...
There was an error while executing `VBoxManage`, a CLI used by Vagrant
for controlling VirtualBox. The command and stderr is shown below.

Command: ["startvm", "31fecaac-d6b9-4750-bd44-c5462e68ea13", "--type", "gui"]

Stderr: VBoxManage.exe: error: The virtual machine 'ubuntu_default_1572159365027_99017' \
has terminated unexpectedly during startup with exit code 1 (0x1).  \
More details may be available in \
'C:\Users\satosi\VirtualBox VMs\ubuntu_default_1572159365027_99017\Logs\VBoxHardening.log'\
VBoxManage.exe: error: Details: code E_FAIL (0x80004005), \
component MachineWrap, interface IMachine
さて、このような情報はほぼすべて忘れた。
Error Relaunching というキーワードで Google
検索した結果、最初に表示されたページに行く。
【VirtualBox 解決】エラーで起動しなくなった(Error -104 in supR3HardenedWinReSpawn!)
(nomad.kixas.net)
要旨は、表題のエラーが出ていた原因が、Trusteer (Rapport) というインターネットバンキング専用ウイルス対策ソフトではないかと見当をつけ、 実際にアンインストールした結果、エラーが解消された、というものである。
読み終わって、私の環境を確認すると、私の PC にも Trusteer が入っていた。 そこで、私も Trusteer をアンインストールした。上記リンクと異なるのは、 私はアンインストールに Geek を使ってみたことだけである。 このソフトウェアは、通常のアンインストールに加えて関連のレジストリまで見つけて削除を促してくれる。
さて、Trusteer を削除すると、とつぜん PC のブラウザに次の画面が出てきた。
https://trusteer.secure.force.com/uff?ubv=3.5.1930.429-standard-release
私はまじめだから、この画面に、Oracle 社の Virtual Box が稼働しないためアンインストールした、
と書いて送信した。
さて、アンインストールした結果の再度の vagrant up はどうか。
C:\Vagrant\private>vagrant up
Bringing machine 'default' up with 'virtualbox' provider...
==> default: Checking if box '**********/+++++++++++++++++++++++++++++' version 'x.y.z' is up to date...
==> default: Clearing any previously set forwarded ports...
==> default: Clearing any previously set network interfaces...
==> default: Preparing network interfaces based on configuration...
    default: Adapter 1: nat
==> default: Forwarding ports...
    default: 8080 (guest) => 8080 (host) (adapter 1)
    default: 3000 (guest) => 3000 (host) (adapter 1)
    default: 8000 (guest) => 8000 (host) (adapter 1)
    default: 22 (guest) => 2222 (host) (adapter 1)
==> default: Running 'pre-boot' VM customizations...
==> default: Booting VM...
==> default: Waiting for machine to boot. This may take a few minutes...
    default: SSH address: 127.0.0.1:2222
    default: SSH username: vagrant
    default: SSH auth method: private key
==> default: Machine booted and ready!
==> default: Checking for guest additions in VM...
==> default: Mounting shared folders...
    default: /vagrant => C:/Vagrant/private

C:\Vagrant\private>
うまくいったようだ。
さて、この vgrant up を実行すると、 仮想化環境として Ubuntu のデスクトップが立ち上がり、ログインできた。 まずは一安心。さて、実環境のファイルを、仮想化環境で読み書きできるのだろうか? その逆もできるのだろうか? そういったことが、中高年には皆目わからない。
今まで述べたことはおととし行ったものだ。久しぶりに C:\Vagrant\private をカレントのフォルダとして、 同じ vagrant up を試したら、こんどは Oracle Vm VirtualBox の画面でつまづいた。 Oracle Virtual Box は 6.1.14 、Vagrant は 2.2.16 である。
Kernel Panic - not syncing: corrupted stack end detected inside scheduler
その後しばらくして、DOS プロンプトでもエラーが出た。
C:\Vagrant\private> vagrant up
(中略)
==> default: Waiting for machine to boot. This may take a few minutes...
    default: SSH address: 127.0.0.1:2222
    default: SSH username: vagrant
    default: SSH auth method: private key
Timed out while waiting for the machine to boot. This means that
Vagrant was unable to communicate with the guest machine within
the configured ("config.vm.boot_timeout" value) time period.

If you look above, you should be able to see the error(s) that
Vagrant had when attempting to connect to the machine. These errors
are usually good hints as to what may be wrong.

If you're using a custom box, make sure that networking is properly
working and you're able to connect to the machine. It is a common
problem that networking isn't setup properly in these boxes.
Verify that authentication configurations are also setup properly,
as well.

If the box appears to be booting properly, you may want to increase
the timeout ("config.vm.boot_timeout") value.
C:\Vagrant\private>
わからない。変わったことといえば、Virtual Box や Vagrant をバージョンアップしたことである。 このバージョンアップで何か問題が起きたのかもしれない。
同じことが起きるかどうか、private とは別に、vagrantup.com で公開されている情報で試してみよう。 generic/ubuntu2004 というのが公開されている情報である。
C:\Vagrant> mkdir ubuntu2004
C:\Vagrand> cd ubuntu2004
C:\Vagrand\ubuntu2004> vagrant init generic/ubuntu2004
A `Vagrantfile` has been placed in this directory. You are now
ready to `vagrant up` your first virtual environment! Please read
the comments in the Vagrantfile as well as documentation on
`vagrantup.com` for more information on using Vagrant.
C:\Vagrant\ubuntu2004> dir
Vagrantfile
C:\Vagrant\ubuntu2004> vagrant up
あれ、やはり Virtual Box の画面で end Kernel Panic が出ている。となると、 Virtual Box の問題だろうか。Virtual Box を 6.1.22 にバージョンアップしてみた。
C:\Vagrand\ubuntu2004> vagrant up
(前略)
==> default: Waiting for machine to boot. This may take a few minutes...
    default: SSH address: 127.0.0.1:2222
    default: SSH username: vagrant
    default: SSH auth method: private key
    default: Warning: Connection reset. Retrying...
    default: Warning: Connection aborted. Retrying...
    default:
    default: Vagrant insecure key detected. Vagrant will automatically replace
    default: this with a newly generated keypair for better security.
    default:
    default: Inserting generated public key within guest...
    default: Removing insecure key from the guest if it's present...
    default: Key inserted! Disconnecting and reconnecting using new SSH key...
==> default: Machine booted and ready!
==> default: Checking for guest additions in VM...
うまくいったようだ。Virtual Box の画面に login プロンプトが出ている。login 名を vagrant として、 password も vagrant とすると、ログインできる。
また Windows からも、vagrant ssh としてログイン可能だ。
C:\Vagrand\ubuntu2004> vagrant ssh
Last login: Tue May  4 05:55:01 2021
vagrant@ubuntu2004:~$ exit
C:\Vagrand\ubuntu2004> vagrant ssh-config
Host default
  HostName 127.0.0.1
  User vagrant
  Port 2222
  UserKnownHostsFile /dev/null
  StrictHostKeyChecking no
  PasswordAuthentication no
  IdentityFile C:/Vagrant/ubuntu2004/.vagrant/machines/default/virtualbox/private_key
  IdentitiesOnly yes
  LogLevel FATAL
C:\Vagrant\ubuntu2004> ssh vagrant@127.0.0.1 -p 2222 -i C:\vagrant\ubuntu2004\.vagrant\machines\default\virtualbox\private_key
The authenticity of host '[127.0.0.1]:2222 ([127.0.0.1]:2222)' can't be established.
ECDSA key fingerprint is SHA256:02O/(省略).
Are you sure you want to continue connecting (yes/no)? yes
Warning: Permanently added '[127.0.0.1]:2222' (ECDSA) to the list of known hosts.
vagrant@ubuntu2004:~$ exit
logout
Connection to 127.0.0.1 closed
C:\Vagrant\ubuntu2004>
うまくいったようだ(2021-05-04)
さて今度は、Docker を調べよう。 Docker とはコンテナ型のアプリケーション実行環境である。 コンテナ型というのは、ハイパーバイザ型やホスト型との対比である。 Linux カーネルが持つコンテナ機能などを使って、 実行環境を他のプロセスから隔離し、その中でアプリケーションを動作させる技術である。
何だか知らないうちに docker でイメージが出てきていた。以下、それを書いておく。 以下、コマンドで単に docker としているが、実際には sudo を先頭につけている。 まず、イメージの一覧を表示する。下記の通りだ。ただし、差しさわりがあるものは省いた。
$ dokcer images
    REPOSITORY              TAG                 IMAGE ID            CREATED             SIZE
    phpmyadmin/phpmyadmin   latest              91490af22618        4 weeks ago         454MB
    mysql                   5.7                 cd3ed0dfff7e        4 weeks ago         437MB
    node                    12.10.0             d8c33ae35f44        2 months ago        907MB
    node                    12.10.0-alpine      ef7d474eab14        2 months ago        80.3MB
次に、詳細を調べた。REPOSITORY なら、次のようにする。
$ docker inspect REPOSITORY
上記のうち、phpmyadmin/phpmyadmin はそれなりの情報が得られたが、 他は [] Error No Suceh Object node などとつれない回答だった。
実は、mysql 関係で困っている。
$ docker-compose up
を実行すると、次のエラーで止まってしまう。
Starting *******-back_db_1 ... done
Starting *******-back_phpmyadmin_1 ... done
Starting *******-back_app_1        ... done
Attaching to *******-back_db_1, *******-back_app_1, *******-back_phpmyadmin_1
(中略)
[1/4] Resolving packages...
success Already up-to-date.
Done in 4.51s.
yarn run v1.17.3
$ nodemon
app_1| [nodemon] 1.18.10
app_1| [nodemon] to restart at any time, enter `rs`
app_1| [nodemon] watching: /*******-back/src/**/*
app_1| [nodemon] starting `ts-node -r tsconfig-paths/register src/main.ts`
app_1| [Nest] 64   - 11/20/2019, 8:41:05 AM   [NestFactory] Starting Nest application...
app_1| [Nest] 64   - 11/20/2019, 8:41:06 AM   [InstanceLoader] TypeOrmModule dependencies initialized +915ms
app_1| [Nest] 64   - 11/20/2019, 8:41:06 AM   [InstanceLoader] PassportModule dependencies initialized +3ms
app_1| [Nest] 64   - 11/20/2019, 8:41:06 AM   [InstanceLoader] JwtModule dependencies initialized +2ms
app_1| [Nest] 64   - 11/20/2019, 8:41:06 AM   [InstanceLoader] AppModule dependencies initialized +7ms
app_1| query: START TRANSACTION
app_1| query: SELECT DATABASE() AS `db_name`
app_1| query: SELECT * FROM `INFORMATION_SCHEMA`.`TABLES` WHERE (`TABLE_SCHEMA` = '*******' AND `TABLE_NAME` = (中略)
(中略)
app_1| query failed: ALTER TABLE `external_account` ADD CONSTRAINT `FK_abcdefghijklmnopqrstuvwxyz0` \
            FOREIGN KEY (`userId`) REFERENCES `user`(`id`) ON DELETE NO ACTION ON UPDATE NO ACTION
    app_1| error: Error: ER_NO_REFERENCED_ROW_2: Cannot add or update a child row: a foreign key constraint fails \
            (`*******`.`#sql-1_a`, CONSTRAINT `FK_abcdefghijklmnopqrstuvwxyz0` FOREIGN KEY (`userId`) \
            REFERENCES `user` (`id`) ON DELETE NO ACTION ON UPDATE NO ACTION)
    app_1|     at Query.Sequence._packetToError (/*******-back/node_modules/mysql/lib/protocol/sequences/Sequence.js:47:14)
端的には、こういうことらしい。すなわち、
ALTER TABLE `child` add FOREIGN key(`id`) REFERENCES parent(`id`);
という SQL 文のときに
#1452 – Cannot add or update a child row: a foreign key constraint fails
というエラーが返るときは、
child テーブルの id に、parent テーブルの id に存在しない値が入っているために出るエラーだ。
上記ブログには、childテーブルのidの値を修正すればOKです。
とあった。しかし、どう直せばよいのか。
そもそも、この MySQL は仮想化環境からしか立ち上がらないのだ。phpMyAdmin を使おうにも、
MySQL が立ち上がらない状態では使えない。
(以上:2019-08-21)
その後、知恵を振り絞ってエラーを解決した。これは仮想化とは直接の関係はないが、念のため記しておく。
child テーブルの id の値を修正すればよいというのは一つの考えである。 しかし、親テーブルに id の値がないというのならば、親テーブルに id の値をダミーで作るというのもありだろう。 わたしはこの方針で対処した。
さいわい、該当するデータを確認することができた。データは、正常に動いているデモページに備わっている phpMyAdmin を使い、SQL 文の形でエキスポートをすることにより取得した。そのデータを確認した結果、 child テーブルにある id で親テーブルにない id がchildテーブルに 2 レコードあったので、 それらの 2 レコードをダミーの形で親テーブルにも作成した。その結果、無事に動作するようになった。 (2019-12-17)
まりんきょ学問所 > コンピュータの部屋 > 仮想化とのたたかい