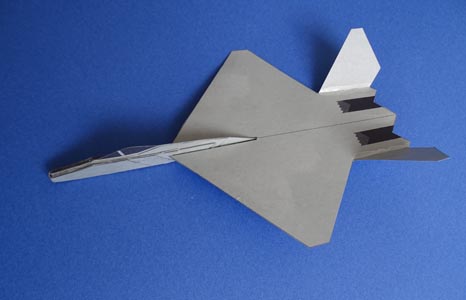
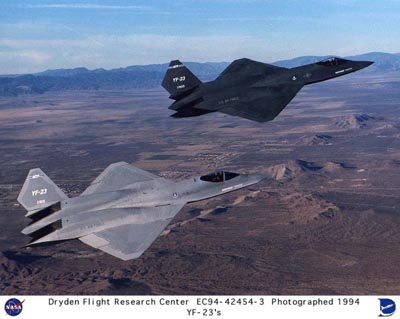
The Northrop YF-23 is a prototype that competed with the YF-22, which later became the F-22, in the Advanced Tactical Fighter Program (ATF), which aimed to create a successor to the U.S. Air Force's F-15 fighter. Its first flight was on August 27, 1990. The Advanced Tactical Fighter Program (ATF) required a maneuverability that surpassed conventional fighters, air combat capabilities greater than the F-15, supersonic cruising (ability to fly at supersonic speeds without using afterburners), and stealth, and the YF-22 was selected as a result of comparative tests with another candidate, the YF-22. It is said that the stealth and speed of the YF-22 were superior to those of the YF-22 due to its unique shape, such as the symmetrical diamond-shaped main wings, the engine exhaust opening diagonally upwards, and the tail fins tilted significantly to the left and right, but the YF-22 won out in terms of maneuverability and expandability, and it became a phantom fifth-generation fighter. It is believed that eliminating the vertical tail and tilting the tail to the left and right will be advantageous in terms of stealth, and it is being considered for use in the Su-75 Checkmate under development in Russia, and in the next generation of fighters under development in Japan, the UK, and Italy. As a paper airplane, I thought that we could not expect much flight performance due to its extremely small aspect ratio, strongly tapered wings, and strongly open V-tail, but it flies surprisingly well. If the tail is tilted too much, yaw stability (weather vane stability) will be insufficient.
How to make YF-23 Gray Ghost
Print the downloaded design on A4 Kent paper. Please install
Acrobat Reader to display and print the pdf file.
Cut out the parts from the pattern along the thick lines. First,
make the cockpit 1. The dotted and dashed lines are mountain and
valley folds, respectively, so bend them with a ruler before
gluing. Next, paste 2 onto the outside of 1. After cutting off
the fuselage 3, make creases along the dotted lines. Fold the
nose part inward, sandwich the cockpit made with 1 and 2, and
fold it. Since the center of gravity is quite far forward, the
nose will be thick, but paste it together as much as possible so
that it does not shift. Next, cut out the catapult hook. Since
the paper is thick, if you cannot cut it with scissors, pliers
may be better. Next, cut out the main wing and tail 4. Paste the
wings and fuselage so that their rear ends match. The tail is
tilted 50 degrees outward from the vertical and 40 degrees from
the horizontal (see diagram). The dihedral angle of the main
wing is 0 degrees, and the plane is left horizontal. Attach nose
covers 5 and 6 to cover the nose. The design is such that the
center of gravity will match without adding weights.
Finishing touches
Give the main wings a slight upward convex arch (camper), and
make sure there is no difference in the twisting between the
left and right sides. To adjust pitch (adjusting horizontal
flight), if the plane is diving with the nose pointing down,
press the area between the main wing and the tail against the
fuselage so that the rear end of the fuselage points slightly,
twist the rear end of the fuselage up, or twist both tails up
(inward).
If flying outdoors, paint the entire plane thinly with lacquer
to increase its water resistance. Clear spray lacquer seems to
be good because it can be applied thinly and evenly. The center
of gravity is aligned when painted thinly. I recommend using
silver-gray Kent paper to create the feel of a military
aircraft.